• Meet Kimberly
  • Kitchens & Baths
  • Services
  • Custom Homes & Additions
  • Testimonials
  • Articles & Events
  • Contact

Solving the Corner Pantry Conundrum

December 8, 2017 by Kimberly Kerl

In the 1980’s, 1990’s and even into the new millennium many homes were built with corner pantry closets that seemed to take up more space than they provided.  Corners are often overlooked and underutilized which may help to account for the large number of builders that quickly adopted the practice of building these cumbersome closets.  Anyone who has a corner pantry closet will tell you they are difficult to organize with their major advantage coming in the form of the door which shuts to hide the carnage inside.

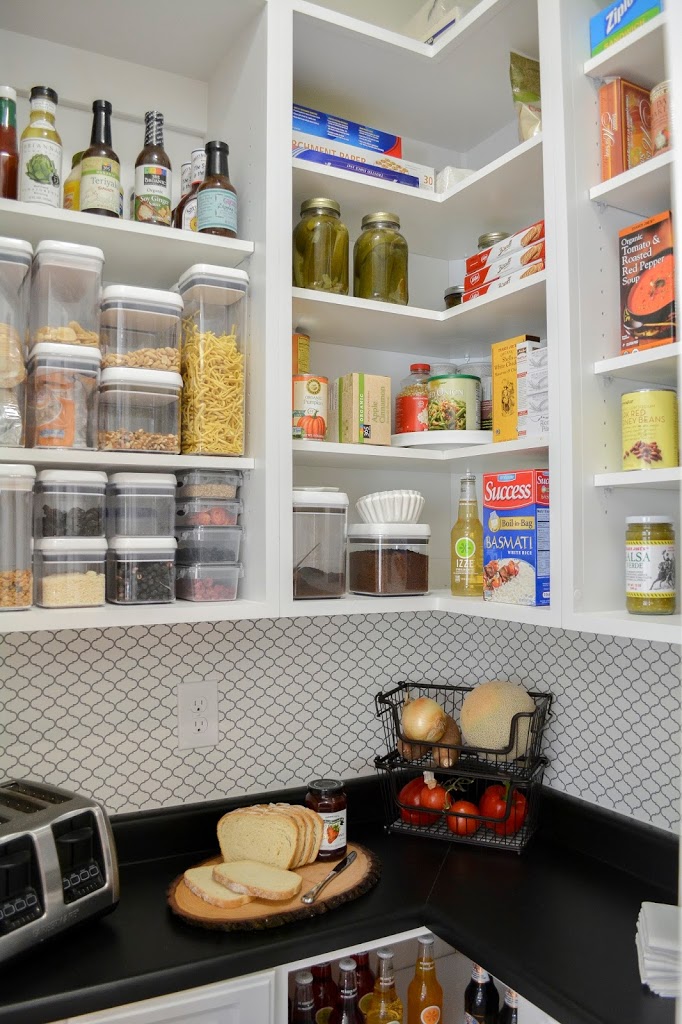
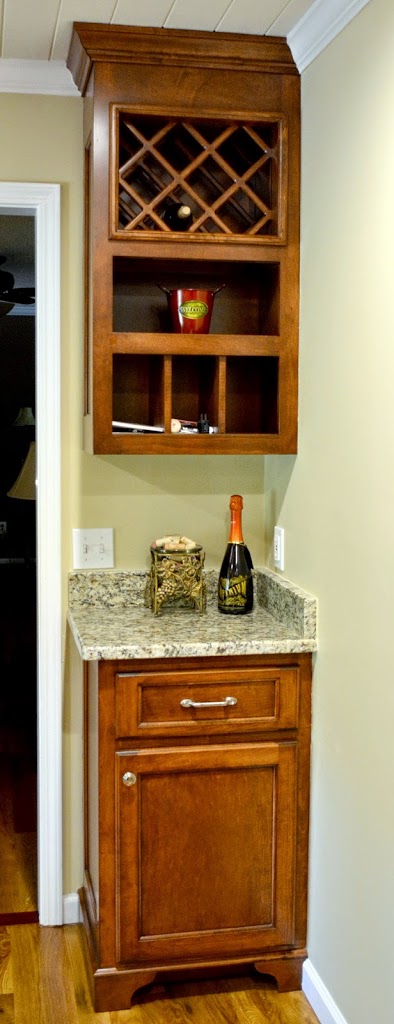
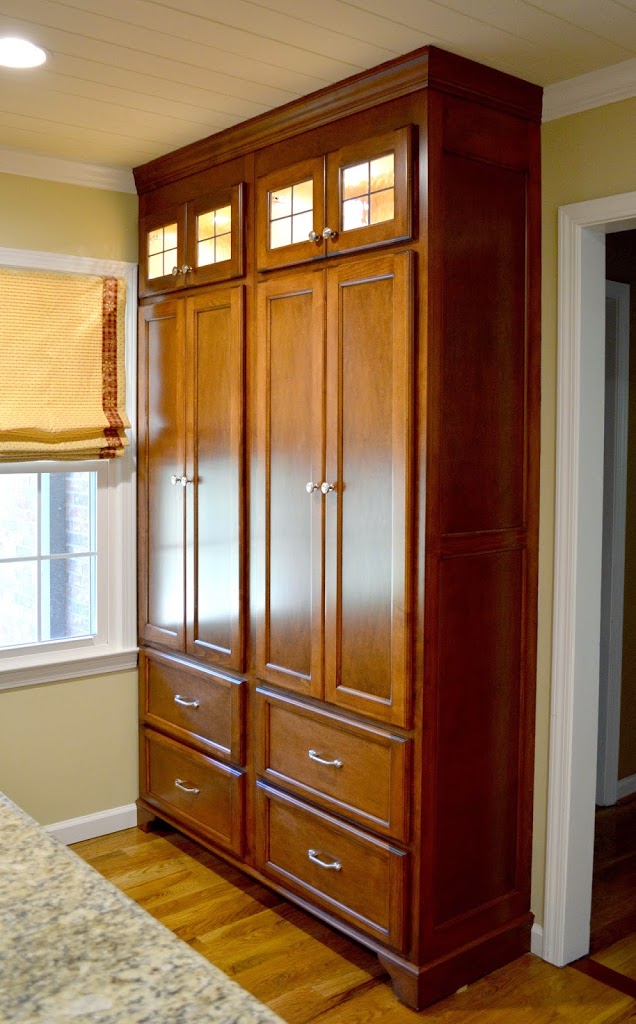
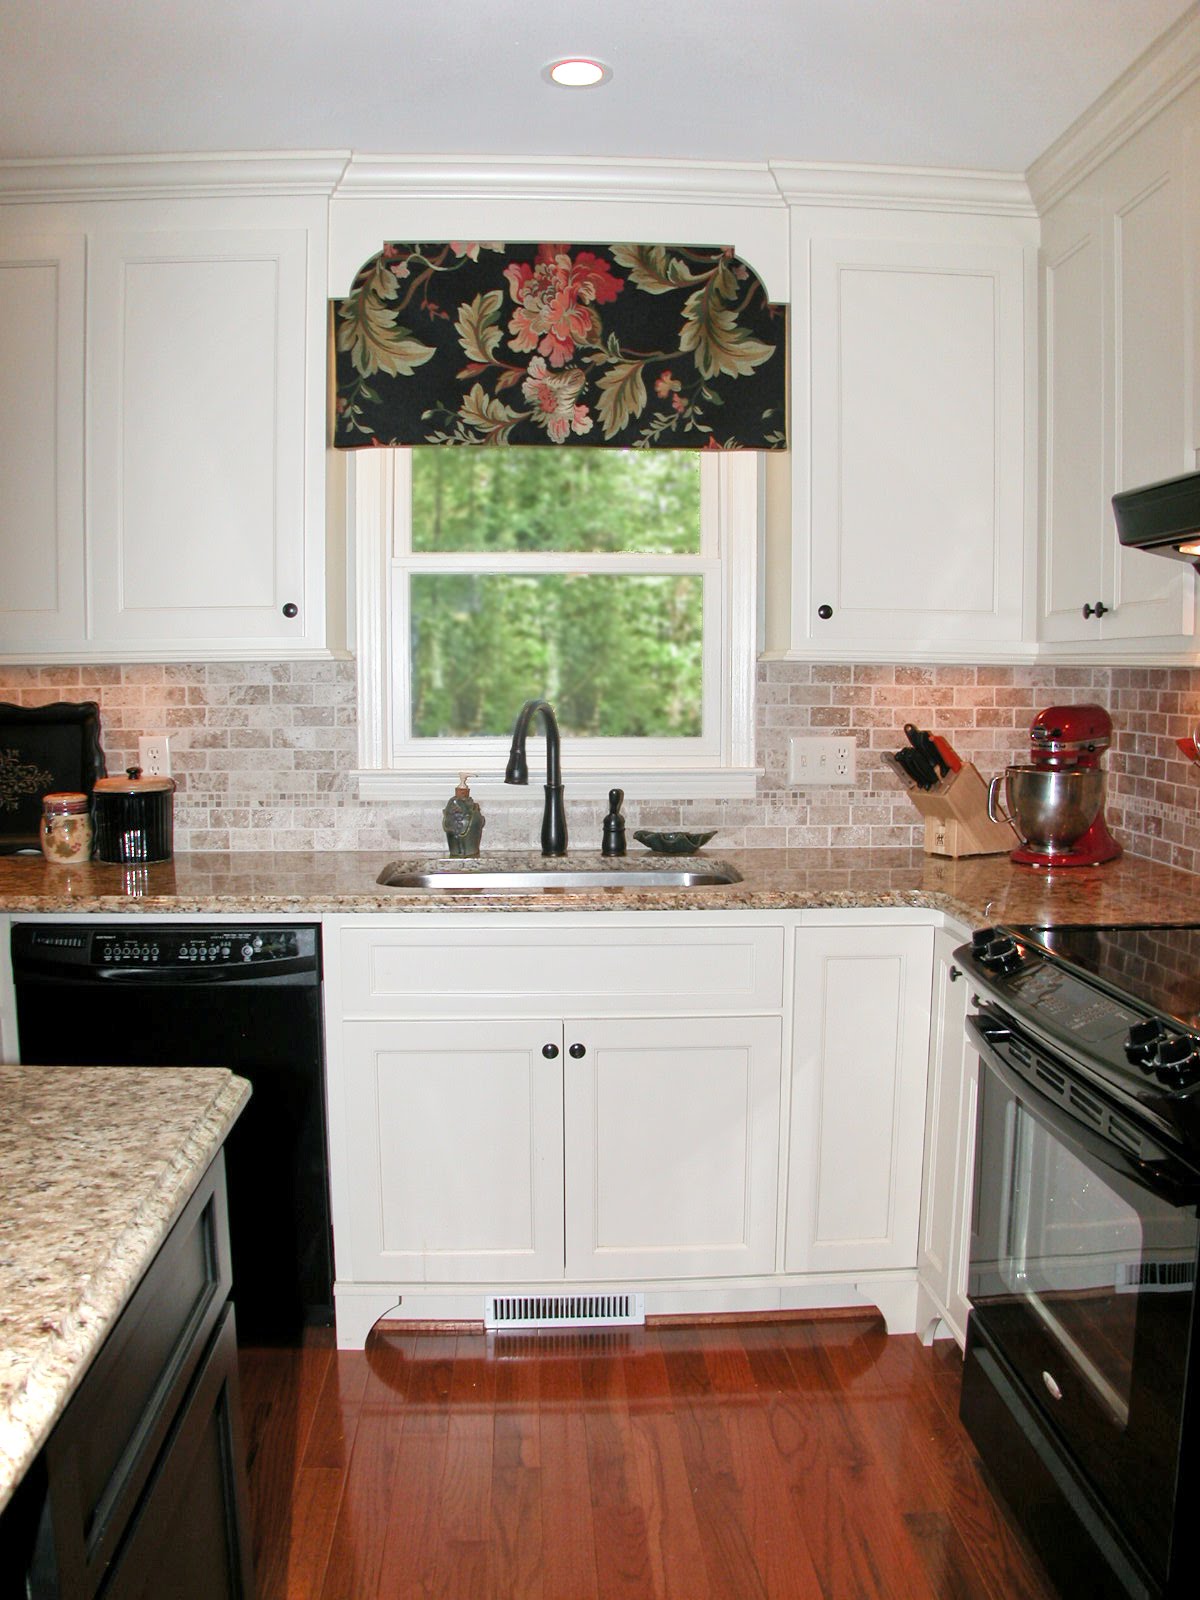
We tackled this problem in a recent renovation and wanted to share how we easily solved the organizational dilemma that is the corner pantry.  First, you must remove the wire shelving that was invented by a twisted soul intent on reinventing a staple of the American home with a flimsy contraption that causes boxes to snag, bags to bust and crumbs to accumulate in an endless supply upon the floor. Half of the problem is now solved!  Next, add low storage with a mix of adjustable open shelves and drawers.  Top the bottom cabinets with a counter.  Add adjustable wall shelving above to provide storage for large and small items alike.  Finally, have some fun by adding a whimsical wall paper accent.

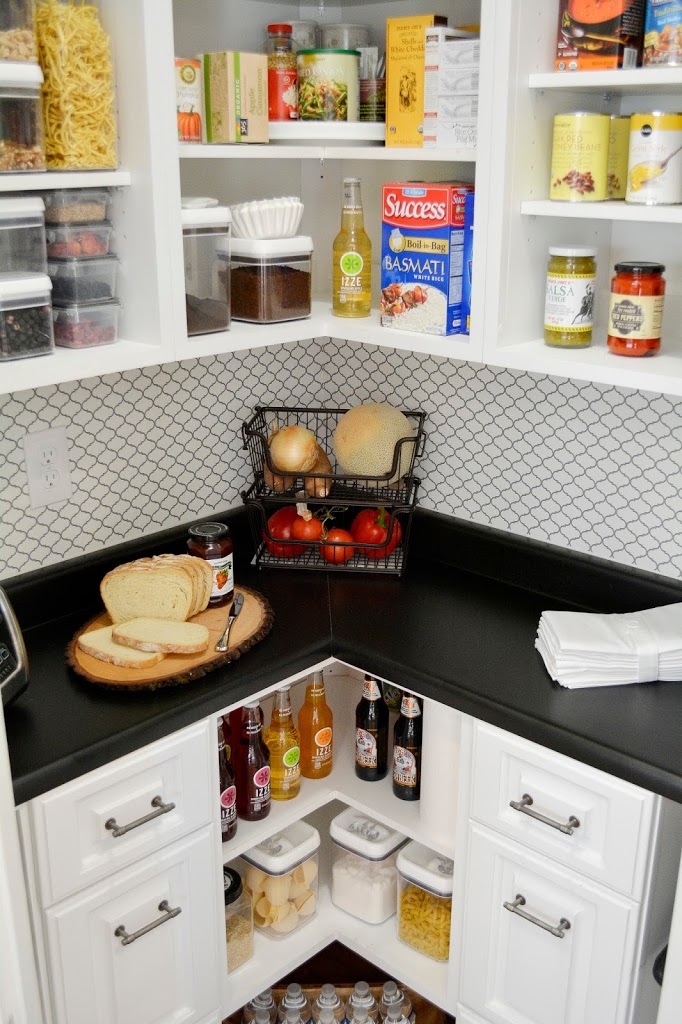
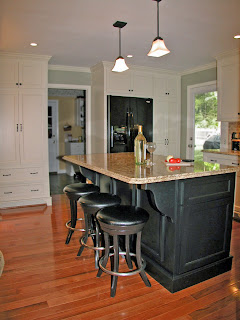
Now instead of useless mess, you have a beautiful breakfast bar, extra prep space or simply an organized pantry.  Even better, the door that seemed oh-so-important to hiding the clutter lurking within is no longer needed! This is one corner (pantry) you would be happy to spend time in.

BlogCatalog

Filed Under: adjustable shelves, Articles & Events, Blog, breakfast bar, clutter, corner closet, corner pantry, design dilemma, greenville, greer, kitchen design, Kustom Home Design, pantry, pantry closet, storage, storage solution, wire shelf

Get Started

Questions? Want to see if we're the right fit?
 
CONTACT US
 

Open & Inviting Kitchen and Bath for a Grand Mountain Retreat

November 14, 2017 by Kimberly Kerl

A grand mountain house was ready for construction in the Lake Lure area of North Carolina, but the homeowner wasn’t satisfied with some of the home’s interior elements such as the kitchen layout and master bathroom design.  Although an architect was hired to design the house, they asked Kustom Home Design to improve upon these spaces and develop new designs.

The new kitchen design took advantage of the limited wall space associated with open concept plans by carefully arranging the major appliances and work centers along the two outside walls.  Positioning the wall oven and microwave in a corner cabinet makes use of often wasted cabinet space.  The sink and dishwasher were centered on the window and the range and refrigerator were place on the opposite wall.

The homeowner wanted a warm, natural feel with rich wood tones and stone accents commonly found in this rustic mountain setting.  The weight of the stained floors and wall cabinets was balanced with a light stained finish on the L-shaped island.  A prep sink makes the island an ideal area to prep food and serve meals.

Lighting from various sources including recessed ceiling fixtures, hanging pendants, interior lit glass front accent cabinets and under counter lights brings life and glow to the space.  Bar seating is available along both sides of the island making this a wonderful place to entertain family and friends.

The island is anchored with a specially designed bar cabinet near the prep sink with open glass ware shelves and closed bar ware storage.

The family room with cathedral ceiling and large transom windows is accentuated by the custom designed stone fireplace with raised hearth, rustic charred wooden beam mantel, kindling niche sheathed in fire brick and built-in glass front storage cabinet. 

The master bathroom was redesigned to provide a large luxury shower, full soaking tub and double vanity.  An arch frames in the tub niche while a window to the shower provides diffused daylight to an otherwise dark space.

Recessed niches repeat the flat arch form and are accented with glass tiles and a clear glass shelf.  A full framed mirror with vanity sconces makes this efficient design feel expansive.

BlogCatalog

Filed Under: Articles & Events, bath design, Blog, cathedral ceiling, corner oven, craftsman, custom bar, kitchen design, l-shape island, led light, luxury shower, mountain, natural, prep sink, rustic, stained cabinet, stone counter, stone fireplace

Get Started

Questions? Want to see if we're the right fit?
 
CONTACT US
 

Ten Steps to a New Kitchen: The Ultimate Homeowner’s Guide

January 2, 2017 by Kimberly Kerl

Chances are you’ve day dreamed about a new kitchen for quite a while, but you just don’t know how to turn those dreams into a reality.  Homeowners everywhere face this dilemma year after year.  Many homeowners will give up on their dreams or buy a new house just because they don’t know where to begin or how to proceed.  

There are 10 steps that will help you get from dreaming to doing.  Each step is just as important as the next, so don’t rush through them.  Take your time and plan ahead.  This is one of the biggest investments you will make in your home and you want it to be perfect!

Step One:  Defining the Dream

A good place to start is always by taking a closer look at where you already are.  In other words, take the time to evaluate your existing kitchen.  Make a list of the things you like and dislike about your existing kitchen.  Maybe you like having two wall ovens instead of a range or you love your gas cooktop, but you can’t stand not having an island and your refrigerator gets in the way of everything.  Here’s a useful tool I created to help get you started, My Kitchen Evaluation & Priority Checklist.

Create Pinterest Boards or Houzz Ideabooks or go old school and clip images from magazines that illustrate kitchen designs you like.  Make notes for each image about why you like it or what appeals to you.  Maybe you only like the cabinet color or hood design and nothing else.  If you don’t note that on the image, you will forget why you picked that picture.  This process is also very helpful in step three.

Step Two:  Seek Professional Assistance 

I know you binge watch Fixer Upper and you’ve seen every episode of Kitchen Crashers, but trust me on this one, you will want professional help.  A professional designer or architect has the training, experience and expertise you need to get your kitchen designed and constructed in the most amazing way possible for your budget.  You probably think you can’t afford an architect or designer, but the truth is you can’t afford not to have one.  Find a qualified designer by searching the NKBA (Nation Kitchen & Bath Association) professional directory or search Houzz.com for local architects and designers.  Ask your friends and neighbors for referrals too.  

A qualified designer will make sure your design functions flawlessly, is an efficient use of space, has a design aesthetic perfectly suited to you, will hold its value and appeal for years to come and will meet or exceed local and national building codes.  They are up to date on the latest design styles, technology and building methods.  They also have a network of trusted contractors, subcontractors and suppliers at their disposal to assist with every aspect of your kitchen design and construction.  They will act as your advocate and provide you with the documents necessary for pricing, permitting and constructing your new kitchen.

Step Three:  Bringing a Design to Life 

In this step you are going to combine steps one and two by sharing the information you gleaned from your kitchen priority checklist and evaluation (step one) with your new architect or designer (step two).  Share with your designer how you use your kitchen, how often you entertain, how many people work in the kitchen at once and any special storage needs you may have.  

The designer will take all of this information, along with precise measurements of your existing space, and create multiple schematic designs for your review.  This is where the excitement begins.  You will get to see your new kitchen coming life!

Step Four:  The Design Grows 

In professional terms this stage is often referred to as “design development”.  During this step, your designer will take the schematic designs from step three and will further refine them based on your comments and suggestions.  This is not like your typical TV design show where the designer comes up with a design and you walk in to find a brand new fully styled kitchen.  This is a process which requires your honest input and criticism.  If you don’t like something, speak up.  If you don’t understand something, ask questions.  If you think you have a better idea, let the designer know.  If you love everything about the design, you are ready to move on to step five.

Step Five:  Selecting the Finishing Touches  

Once you have a design you love, it’s time to dress it up.  This step could happen later in the process, but there are advantages to doing it now.  If you select your appliances, countertops, cabinet hardware, light fixtures, plumbing fixtures, flooring and colors (to name a few) at this stage then you won’t be pressured to make rash decisions during construction.  You also won’t have a delay in construction when you are surprised to find out the tile you want is on back order for two months.

By selecting your finishes and materials during step five, you also guarantee that you will receive more accurate pricing from contractors.  If you plan to seek multiple prices, this step will result in bids which are more comparable and makes selecting your contractor much easier. 

Step Six:  Design Documents 

At this stage, your designer will produce a series of drawings and specifications for your use in bidding and building your project.  The documents typically include a site plan (if you are adding on), demolition plan (if you are tearing out), floor plan, cabinet elevations, lighting plan and finish schedules.  These documents will be used by your contractor to estimate the cost of the project, secure permits and construct your new kitchen.

Step Seven:  Select a Contractor 

Selecting a contractor is a very important step.  Ask your designer, friends and neighbors for referrals.  Interview each contractor and ask for a list of client referrals.  Call the referrals.  Ask about the quality of the work and the timeliness of the crew.  You want to know if the contractor stayed on budget and on schedule.  Request to see some finished projects.  Most of all, trust your gut and don’t base your decision solely on price.  The success or failure of your project hinges on your ability to effectively communicate with your contractor.  You have to be able to trust him or her with not only your home, but with your family.  Choose someone you trust and someone who is bonded and insured.

If you plan to competitively bid the project, do not select more than three bidders.  Asking a contractor to bid against two other contractors is reasonable, asking them to bid against five is unreasonable.  If you have a quality, trusted contractor you love, it’s OK to negotiate a price and skip the bidding process all together.

Step Eight:  Build the Dream

Once a contractor is selected, contracts signed and initial payments made, it is time to start building the dream.  Decide whether you plan to live in the home during the renovation or move out.  Don’t underestimate the inconvenience of living through a major renovation.  You are likely to be without utilities at times and you will not have a functioning kitchen for several weeks.  The construction area will need to be sealed off from the rest of the house to prevent the spread of dust and debris, so if you’re required to walk through your kitchen to get to another part of the house you may want to consider moving out temporarily.

Construction is loud and it is messy.  Don’t plan to take naps or conference calls at your home during this time.  Be patient, be flexible and be informed.  If you have a question, don’t hesitate to ask your contractor.  Rely on your designer for construction therapy if need be.  Just remember that every bang, cut and scrape is getting you closer the kitchen of your dreams.

 Step Nine:  The Punch List

As construction winds down and the contractor is nearing completion, you will be asked to make a list of any errors, defects or deficiencies you see in the work.  This is called a Punch List.  You may find cabinet doors that need adjusting or floors with a deep scratch.  Maybe the hood isn’t working or the faucet drips.  This is your opportunity to list the items you would like to see corrected before the contractor moves on to the next project and before you make final payment.

Be reasonable.  If you aren’t sure if something is reasonable, ask your designer.  Designers are aware of what’s considered acceptable tolerances.  Establish a date of completion for Punch List items so everyone knows what to expect.

Step Ten:  Enjoy Your New Kitchen 

Once all the excitement of construction is over, it’s time to enjoy your new kitchen!  Organize your dishes, pots and pans.  Add special touches with artwork and decor.  Fire up your new appliances and cook your first meal.  The kitchen is the heart of our home and you’ve just received a new heart full of energy and life.  Enjoy it, share it, entertain your friends and neighbors in it.  You’re going to love your new kitchen!


BlogCatalog

Filed Under: Articles & Events, Blog, custom home design, custom kitchen, design process, kitchen, kitchen appliances, kitchen design, kitchen designer, NKBA, planning, popular kitchen, popular kitchen style, professional design, style, trends

Get Started

Questions? Want to see if we're the right fit?
 
CONTACT US
 

Appliance Innovations You Should Know About

June 1, 2015 by Kimberly Kerl

The 2015 Kitchen and Bath Industry Show in Las Vegas was packed with appliance manufacturers featuring their latest and greatest products.  I browsed them all and compiled a list of the most impressive new appliance features that you should pay attention to.

SIDE OPEN OVEN:  Bosch’s 30 inch Benchmark Series Wall Ovens are available with side opening doors.  The ovens come in either right or left swing doors.  This is an option you should expect to see more of and one you may want to consider for your next wall oven.

The side opening door allows for easier transfer of heavy items in and out of the oven and when mounted at the appropriate height, it is accessible for those in wheelchairs.


SPEED MICROWAVE OVEN:  Everyone likes to save time, energy and space.  A speed microwave helps you do just that.  Instead of eating up valuable real estate in your kitchen with a built-in microwave and second convection oven, you can use a combination microwave/convection oven like the one made by Bosch.  

The ovens come in either 27 inch or 30 inch widths and the Bosch Benchmark series ovens are designed to align with one another in both vertical and horizontal configurations.  The sleek design also allows for a flush installation so the face of the appliance aligns with the face of your cabinets.


FRONT CONTROL 30 INCH GAS RANGES:  This may not sound exciting to many of you, but finding a 30″ gas range with front mount controls has been a difficult proposition that is finally getting a little easier.  Thermador and Frigidiaire both offer 30″ gas ranges with front controls.  From a design perspective, the front controls allow you to have a clean look with an uninterrupted backsplash; however, that’s not the only advantage.  Front mount controls also prevent you from reaching over hot elements or pans to reach the controls.


CUSTOM PANELED REFRIGERATOR/ FREEZER COLUMNS:  More and more homeowners are realizing the advantages of having full column freezers and refrigerators as opposed to a combination refrigerator/freezer.  As these products gain in popularity so do the design options.  Appliances designed to accept custom panels have swung the design door wide open.  Refrigeration design options are limitless with the new custom panel configurations offered by Thermador’s Freedom Collection.  The design below was featured at KBIS 2015 and includes custom made wood panels on the wine columns and custom made copper panels on the refrigerator and freezer columns.

 
The newly engineering hinges on the Thermador Freedom Collection refrigeration units allow them to support tremendous weight and still achieve a 115 degree swing.  This series of refrigeration columns have custom designed quartzite panels and handles.

Appliance innovations abound each and every year with a dizzying array of options, accessories and price points.  When you’re ready to upgrade your appliances or design your dream kitchen space, seek the advice of a professional who can help lead the way.


BlogCatalog

Filed Under: appliances, Articles & Events, Benchmark, Blog, Bosch, custom kitchen, Freedom Collection, Frigidaire, innovation, KBIS, kitchen appliances, kitchen design, NKBA, stainless steel, Thermador

Get Started

Questions? Want to see if we're the right fit?
 
CONTACT US
 

From Dark to Dreamy: a Modest Kitchen Makeover with Bold Results

October 29, 2014 by Kimberly Kerl

Stained wood can add charm, warmth and richness to our homes, but it requires a certain level of balance to prevent it from becoming overwhelming, dark or oppressive.  The balance in this project had yet to be achieved, but there were elements worth saving that would help transform the space from dark to dreamy…

Stained floors, ceilings and cabinets coupled with dark red walls made the space feel tight and outdated.
While a small island formed an obstacle that interrupted the flow and function of the kitchen and didn’t provide a large enough prep surface.
The dual loaded galley style kitchen with center island created a bisected space with narrow working aisles leaving the eating area underutilized and inefficient.
The existing kitchen plan had tight circulation clearances and limited work surface.  Foot traffic from the Foyer flowed directly through the working area and in front of the often used refrigerator.  It was not conducive to entertaining or accommodating for multiple cooks.  The breakfast table was not needed, but better access to the dining room was.
The new design keeps the flow of traffic outside of the kitchen working area allowing us to eliminate the cabinetry on one side of the kitchen to increase aisle clearances, provide an open area in front of the refrigerator and improve the overall function of the kitchen.  Enlarging the opening to the Dining room creates connection to this previously separated space and makes entertaining an ease.  The long island provides ample work surface and a casual dining area.

The renovated kitchen is bright and beautiful.  We preserved the stained wood floors, kept the wood ceiling and lightened it with paint, replaced the cabinetry with a balanced combination of stained and painted cabinets and upgraded the counters and appliances.  The sink and range were left in their original positions to reduce cost, but they are integrated into the new design with such skill that they appear as if they are meant to be.
The elongated island provides separation between the working and entertaining areas of the space and provides a wonderful wide work surface with under counter storage accessible from each side.

The new pantry cabinets and dry bar provide ample and efficient storage space and beautifully anchor the end of the kitchen.

The gas range frees up space previously occupied by a wall oven and has an under counter microwave conveniently located next to it.  The counter-depth refrigerator looks sleek and stylish, but it is also very functional because it doesn’t protrude into the working aisle.

A prep sink located in the island with a flanking trash drawer creates the ultimate chopping and prep area.
New lighting and thoughtful details bring the space to life adding visual appeal and decorative highlights.
 New granite countertops with a radiused edge add to the beauty of the space and provide a durable work surface ideal for an active family.  
This new design provides the homeowner with a kitchen they love and an entertaining space that works for large and small groups every day of the week.  We were able to transform this dark space into a dreamy kitchen full of light and loveliness.

BlogCatalog

Filed Under: appliances, architecture, Articles & Events, Blog, cabinetry, design inspiration, granite countertop, hardwood floors, houzz, kitchen, kitchen design, kitchen renovation, kitchen trends, NKBA, planning, residential design

Get Started

Questions? Want to see if we're the right fit?
 
CONTACT US
 

Before & After…a 1980’s Kitchen gets a makeover

April 20, 2010 by Kimberly Kerl

This is what we started with…

The existing kitchen was a typical 1980’s eat-in style. The breakfast table was at one end with the cabinetry and appliances at the opposite end. The refrigerator and pantry closet were located on the wall between the kitchen and den. There was a standard size door opening between the den and kitchen. The appliances included the original wall oven with microwave above, cooktop, hood, dishwasher, and a standard sized side-by-side refrigerator. The countertops were plastic laminate with a standard 4” integrated backsplash. The cabinets were site-built and had been painted white over the original dark stain. The flooring was the original sheet vinyl and the walls and ceiling were painted sheetrock.
Lighting was also original to the house and was very dated with the large wood framed fluorescent and white and brass chandelier.


This was the problem…

The main task was to design a solution that would provide the most improvement for the least amount of money.  The kitchen was currently
closed off from the rest of the house although it served as a main artery by feeding access to the laundry room and garage, back yard deck, den and dining room. Improved flow with the rest of the house and transforming the space into a central gathering area for family friends became a priority. The current design had very little counter space. The sink, cooktop, and wall oven ate up much of the counter leaving less than 5 ½ feet of workspace, so more workspace was a must. Other desires included improved lighting, new appliances, more efficient storage, and updated finishes.


This is the solution…

 
The renovation transformed not only the kitchen, but almost the entire main living level without much disruption to the home. By opening up the wall between the kitchen and den and replacing the breakfast table with an eat-in island the whole living space was transformed. The kitchen and den now function beautifully together and provide a fantastic space to gather and complete homework or to gather with friends and socialize.

The additional cabinetry and workspace makes the kitchen a joy to work in. Pantry storage is contained in an extremely efficient and easy to use butler’s cabinet, while utility items are neatly stored in the utility cabinet next to the new counter depth refrigerator. The spaces are as beautiful as they are useful. This entire renovation was custom designed with thoughtful consideration and integration of all elements including the structure and framing, electrical and lighting, plumbing fixture selection, appliance selection and placement, cabinetry detailing, new hardwood flooring, new paint, custom tile backsplash and carefully selected granite countertops. All of these changes were made for less than 10% of the value of the home. The renovation was completed within two months and it has significantly improved not only the homes value, but more importantly the family’s quality of life.

If you are considering remodeling, renovating, or adding onto your house; or if you want to know what is possible…contact me and I will give you design solutions you never thought were possible and will leave you wondering how you ever lived without them. For more information on this project or for vendor references please visit my Profile for contact information or simply leave a comment.
Cabinet Maker:  David Drummond, D Square Custom Cabinets  (864)640-3227 cell
Cabinet Finisher:  Joey Dill, Southern Coatings (864)304-7997
Hardwood Flooring Installation:  Ben Quebe, Quebe Flooring (864)303-6347
Appliance Sales & Installation:  Alan White, White’s Appliances (864) 859-8208
Countertop Fabricator & Installer:  David Springer, Campbell Tile (864) 288-3371
Granite Supplier:  Robbie Rousey, Classic Granite & Marble, Inc. (864) 292-0784
Plumbing Fixture Supplier:  Carmen Runion, Ferguson Enterprises (864) 288-0281
Light Fixtures:  The Lighting Center (864) 268-4822
BlogCatalog

Filed Under: appliances, architecture, Articles & Events, Blog, cabinetry, design, granite countertop, hardwood floors, home, house plans, kitchen design, remodeling, renovation

Get Started

Questions? Want to see if we're the right fit?
 
CONTACT US
 

Located in Greenville, SC
Phone: 864.561.4103
E-mail address: inquiry@kustomhomedesign.com

Copyright © 2025 · Foodie Pro Theme on Genesis Framework · WordPress · Log in