• Meet Kimberly
  • Kitchens & Baths
  • Services
  • Custom Homes & Additions
  • Testimonials
  • Articles & Events
  • Contact

An Island Cottage is Restored in Southern Coastal Fashion

October 15, 2018 by Kimberly Kerl

Fripp Island is a secluded coastal community that lists off the Southern tip of South Carolina.  It sleeps in the shadow of historic Beaufort and adopts the gentile nature of it’s southern heritage.  It is a quiet oasis and vacationer’s dream.  The homes are not old and they can’t be considered historic, but they are starting to show their age and many are in need of a facelift.  One such cottage was purchased by a friend of mine who’s personal design style teeters between rustic farmhouse and old school nautical.  She had a clear vision for the home, but needed a guide to help her navigate the choppy waters of a large scale renovation.

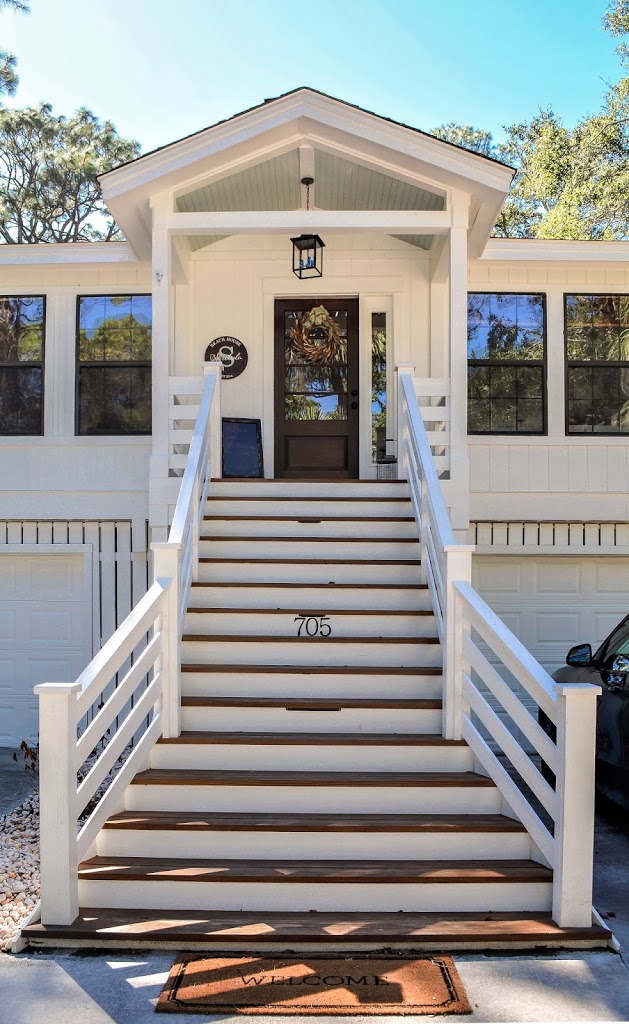
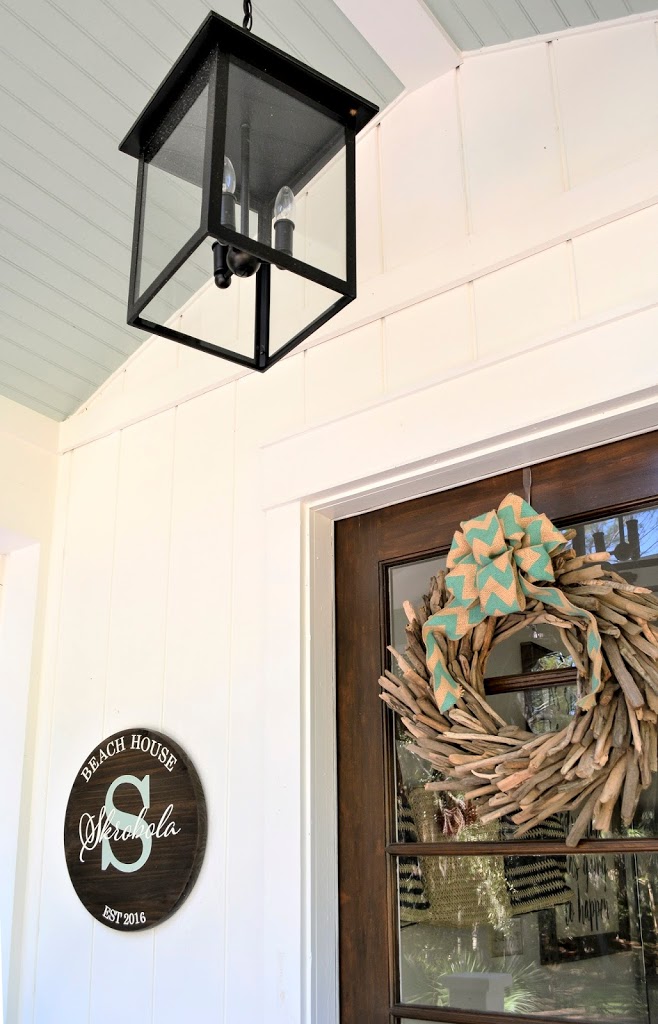
Exterior View of Entry AFTER Renovation

The existing plan and decor was typical for it’s age with a small kitchen removed from the living space and pastel color scheme.  A pantry closet and refrigerator niche bisected the main living area, making the home feel small and cramped.

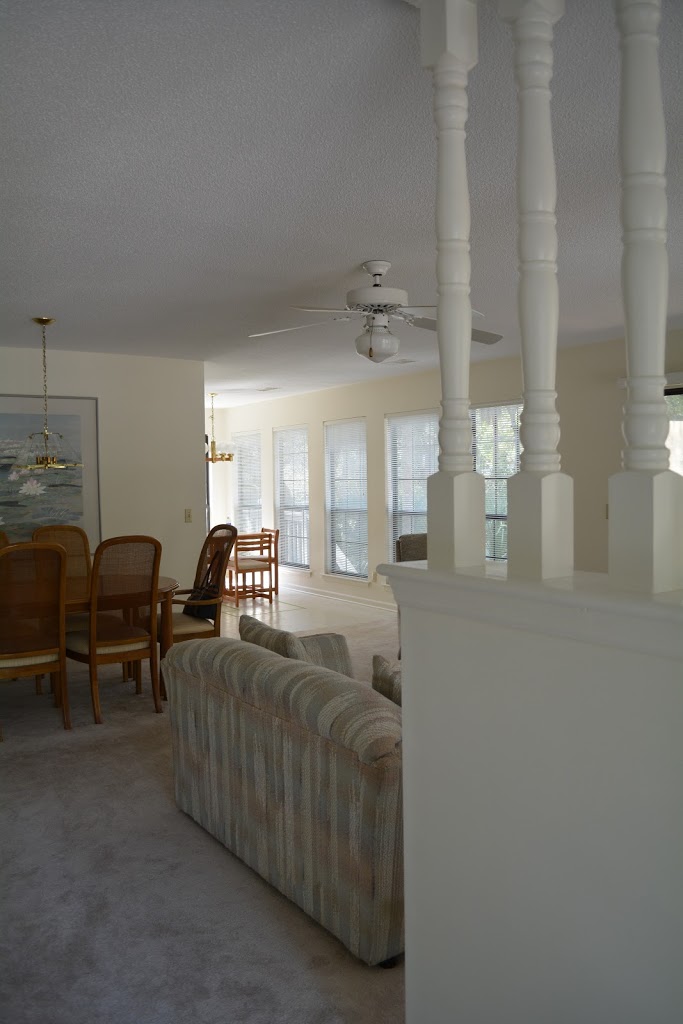
Views of Interior BEFORE Renovation
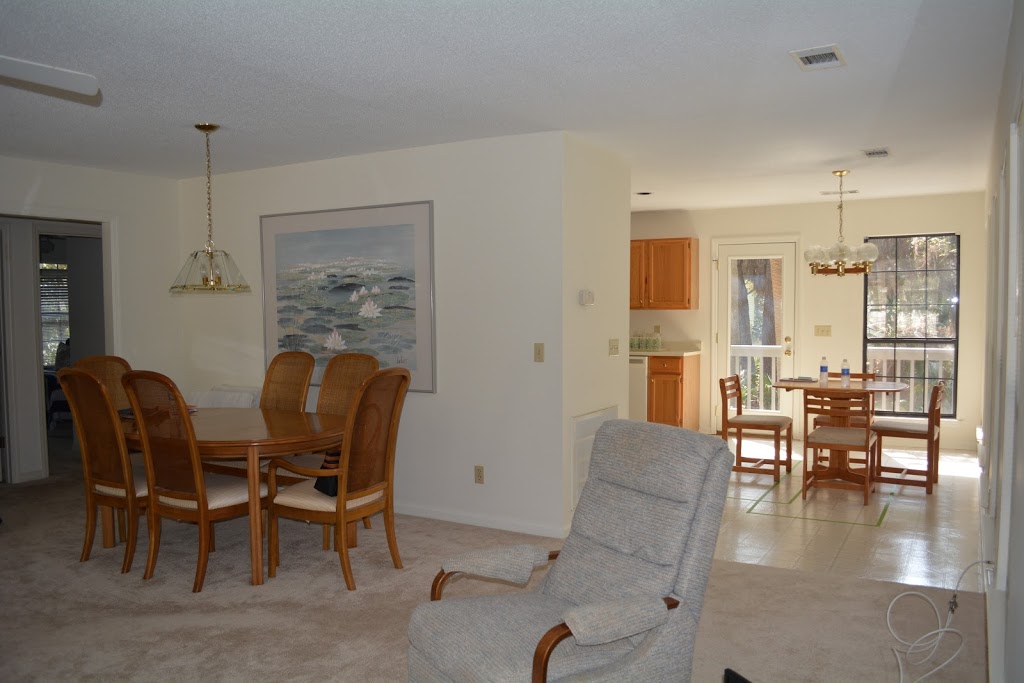
Interior View BEFORE Renovation
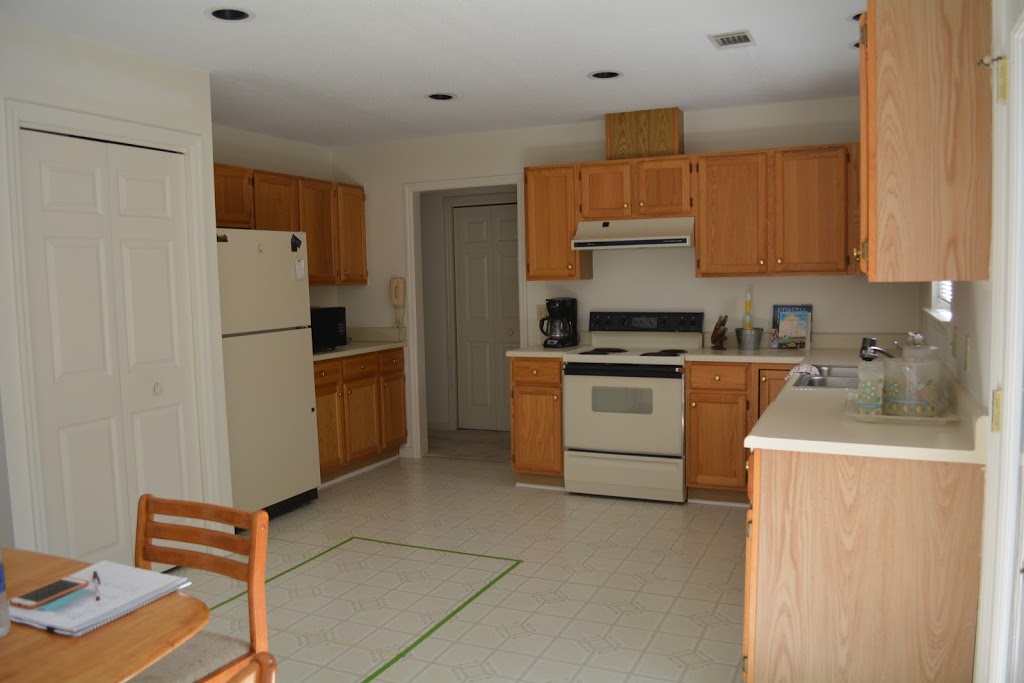
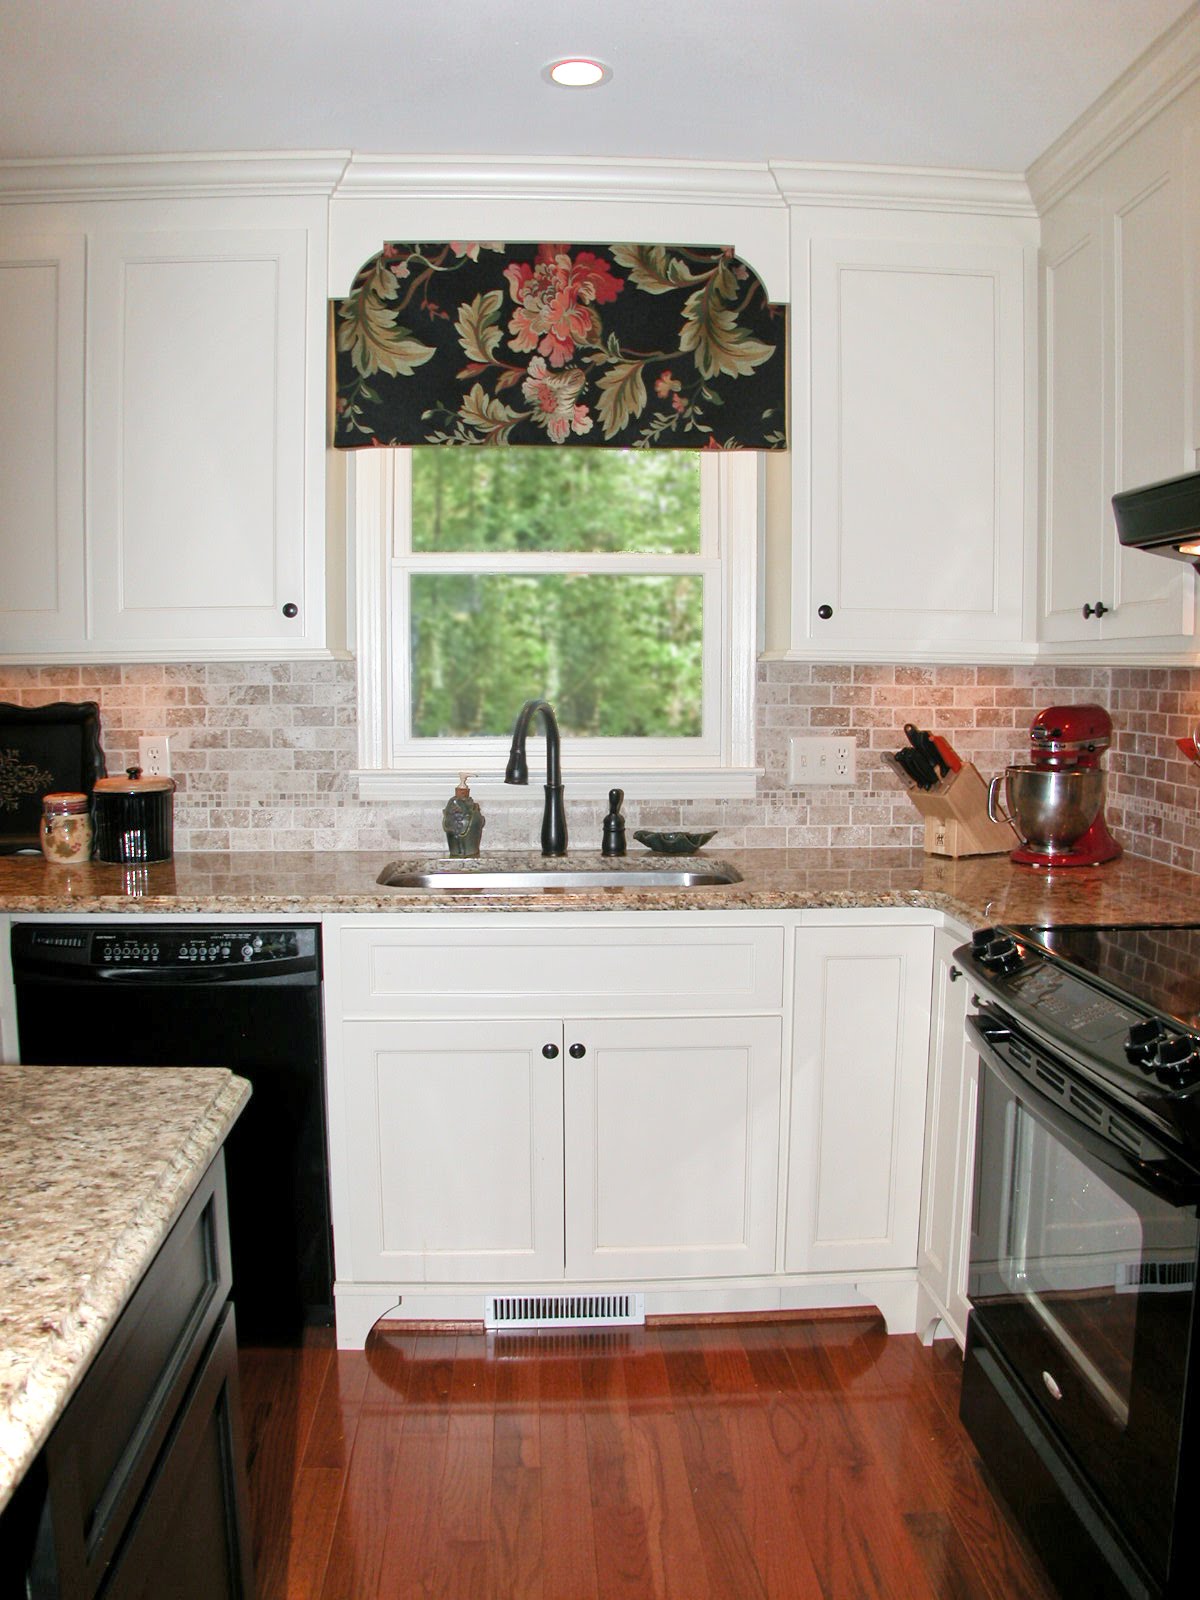
Kitchen View BEFORE Renovation

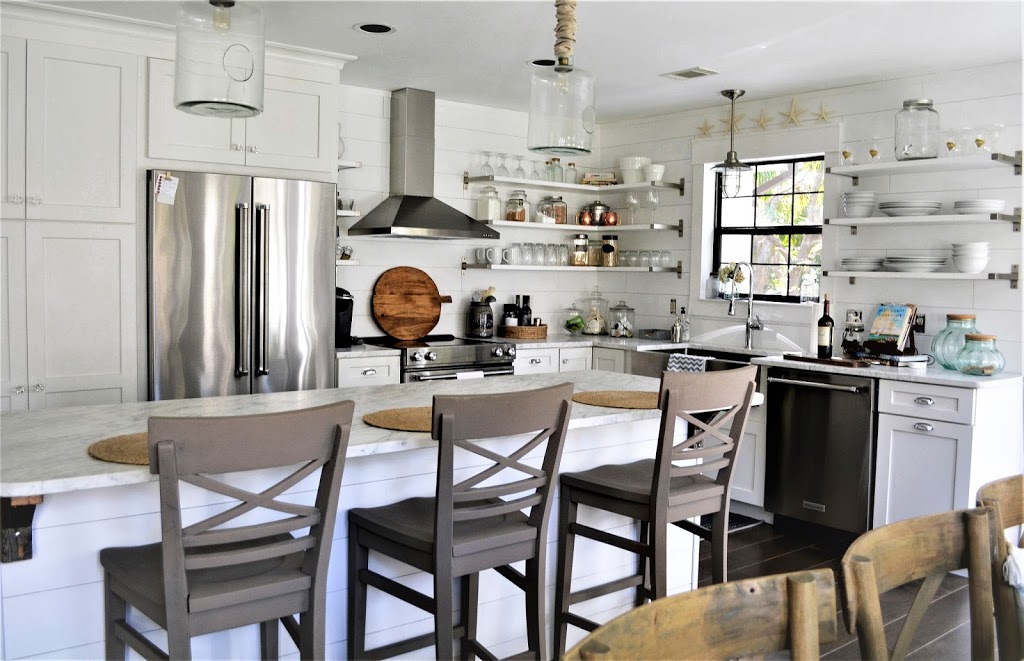
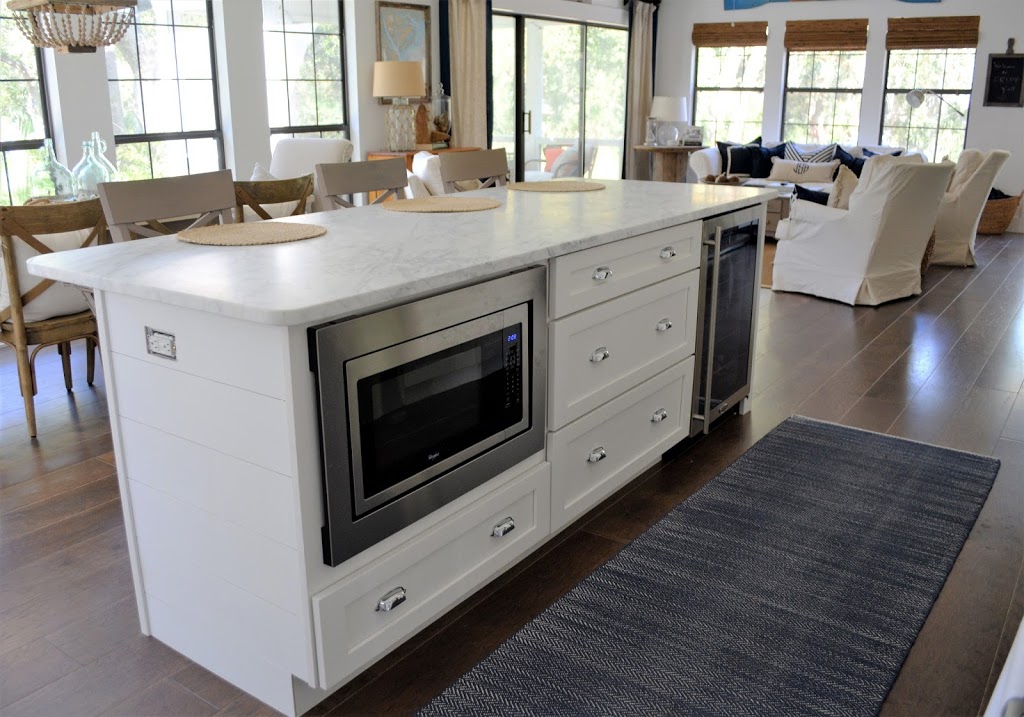
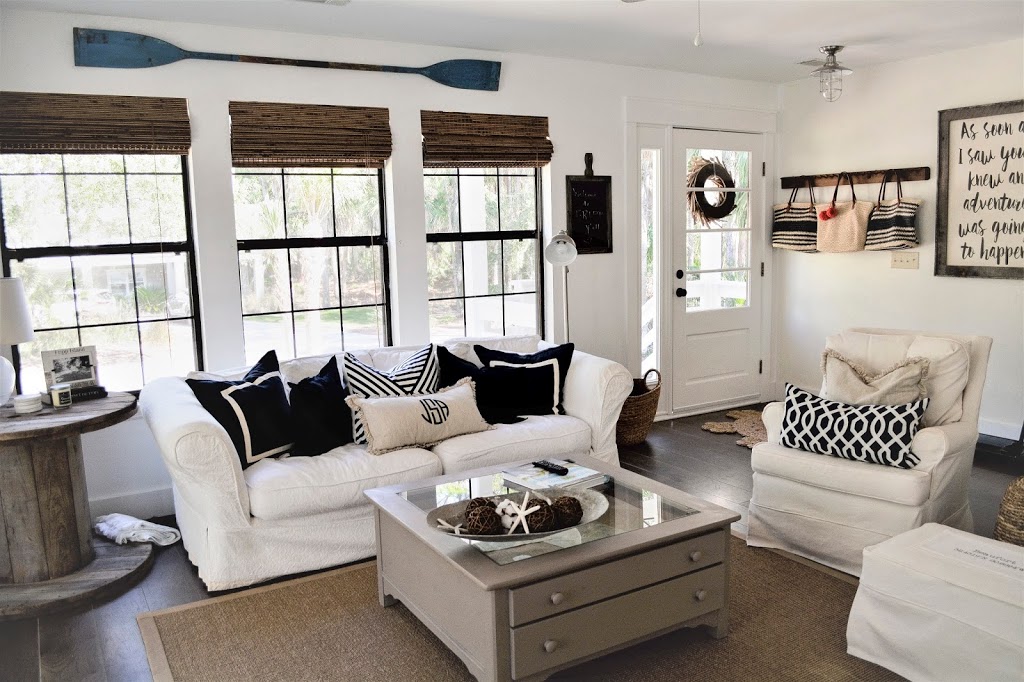
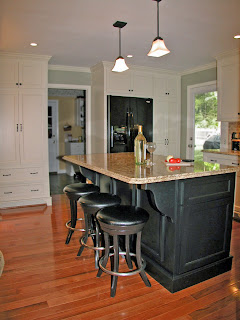
By removing the walls and redesigning the kitchen with a  large island, we gave the home a breath of new life.  The creative layout maintained the location of the range, sink and dishwasher which helped to keep costs under control, but relocated the refrigerator and pantry in a way that made the kitchen function and feel much better.


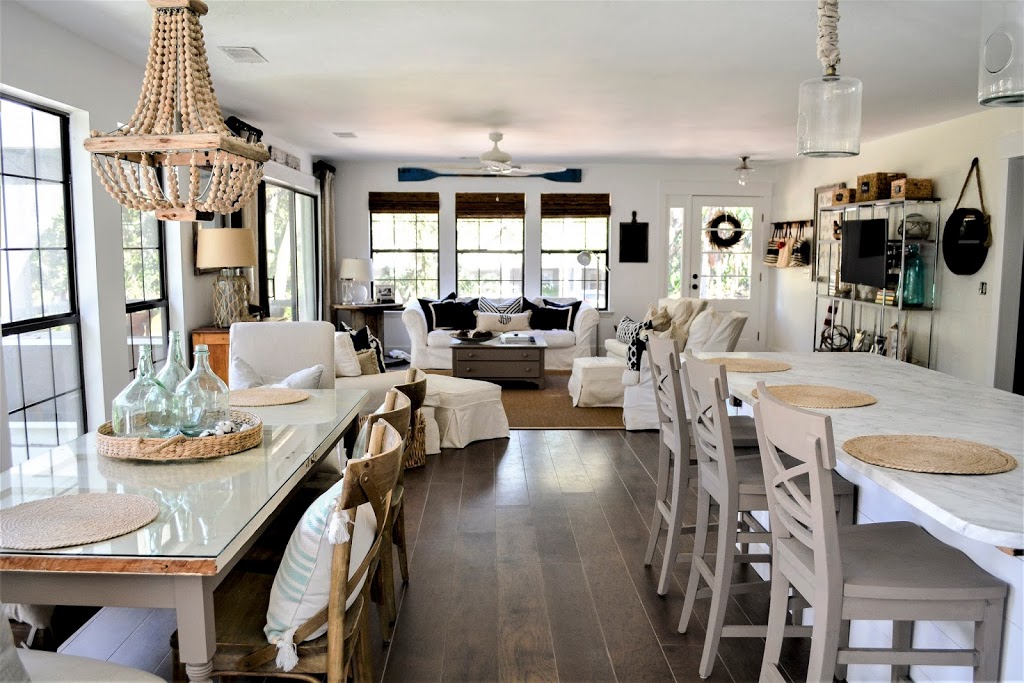
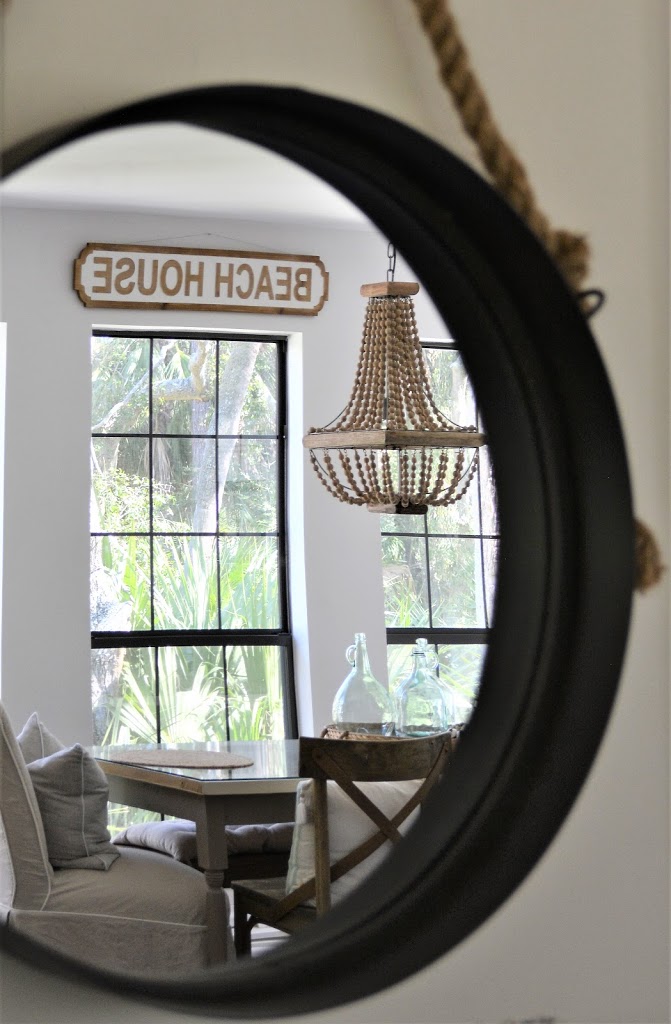
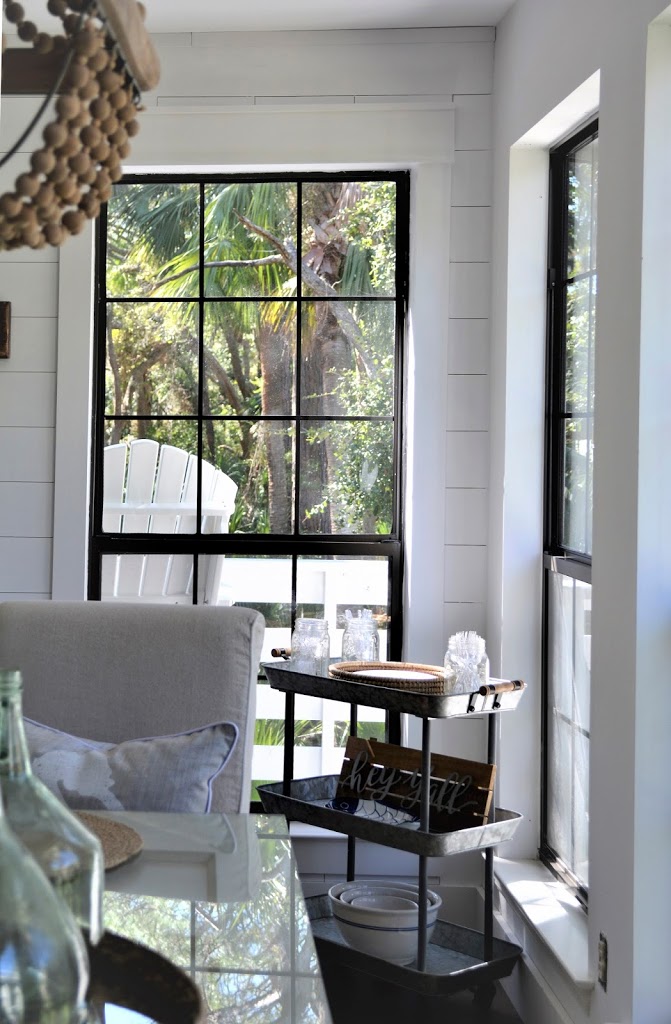
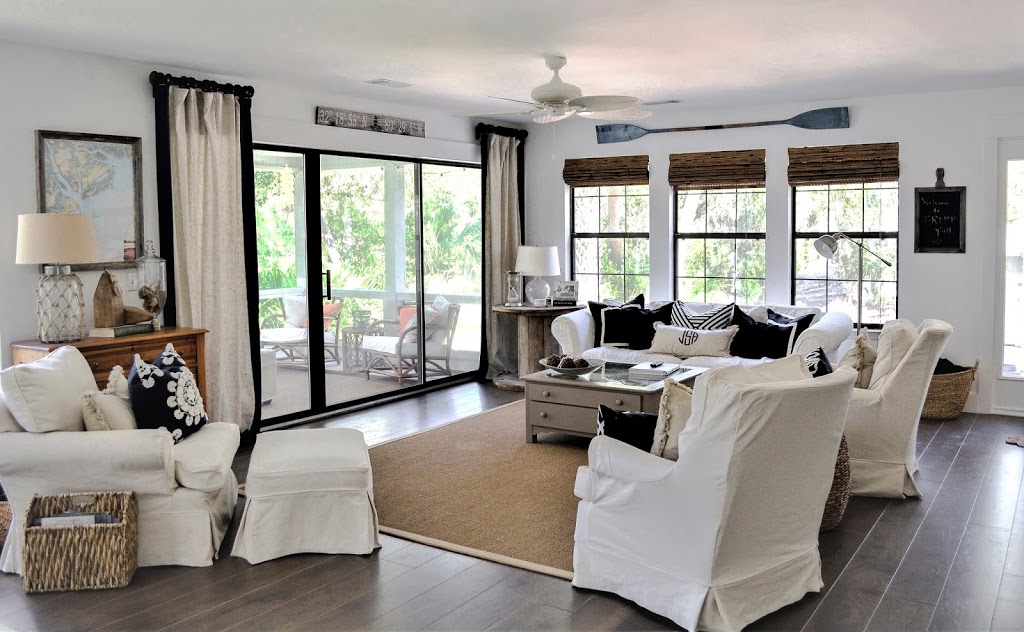
Large meals and many visitors can be served in the new kitchen which is open to the casual dining area and living space.  The dining table is flanked by a row of windows which allow the sunlight in and the views out to the lush tropical landscape.


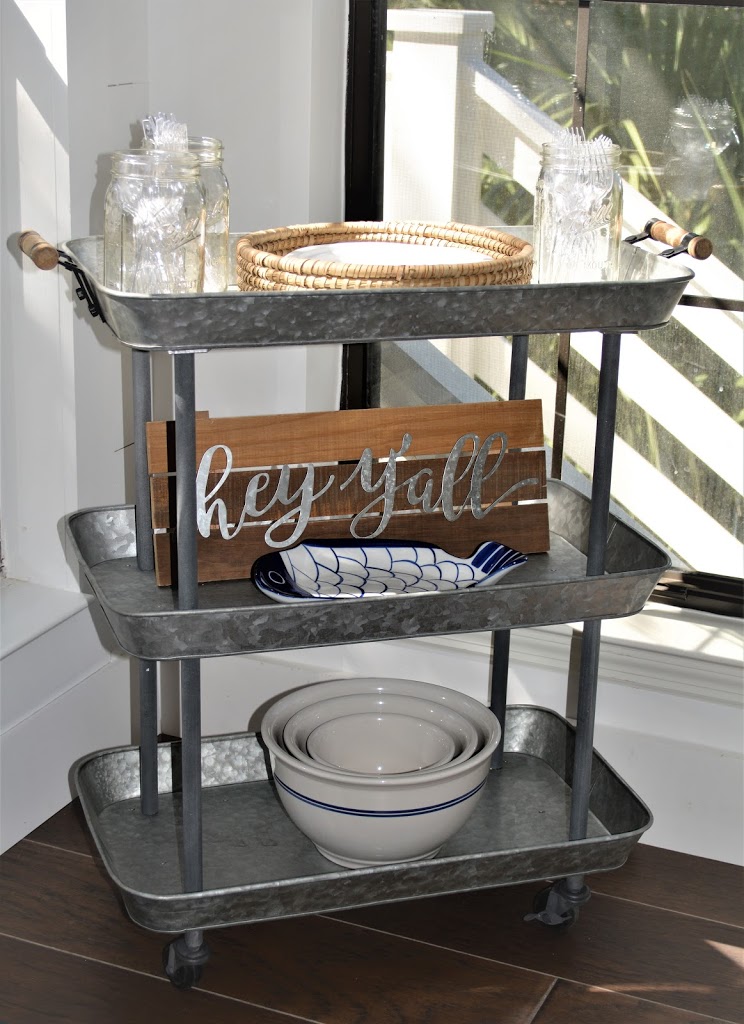
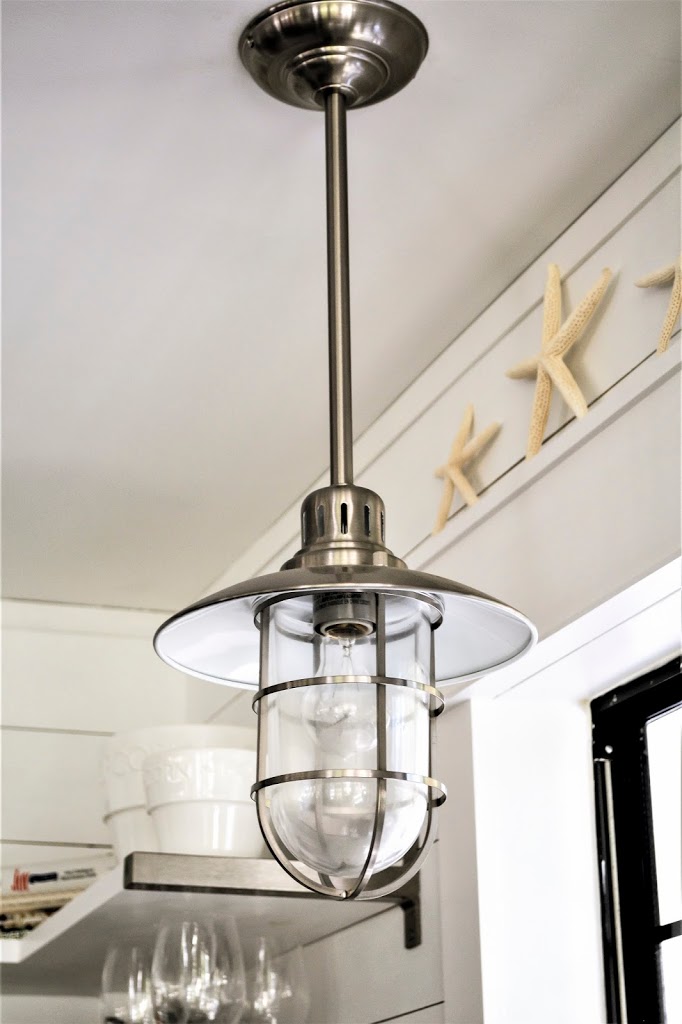
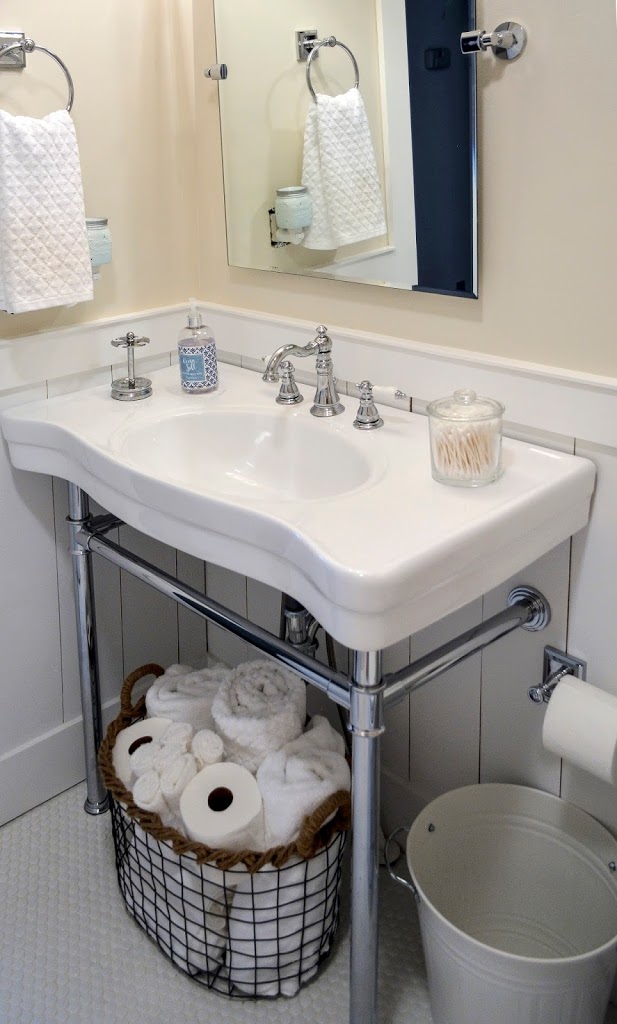
Open shelves and crisp white shiplap adorn the kitchen walls where dishes and drink-ware are an easy reach away.  Dark wood floors ground the open plan and contrast nicely with the white walls, cabinets and counters. Dark window sashes and mullions frame the island views and add a sophisticated touch to such a casual space.  Polished chrome, satin nickel and stainless steel combine effortlessly to add just the right amount of shimmer and shine.


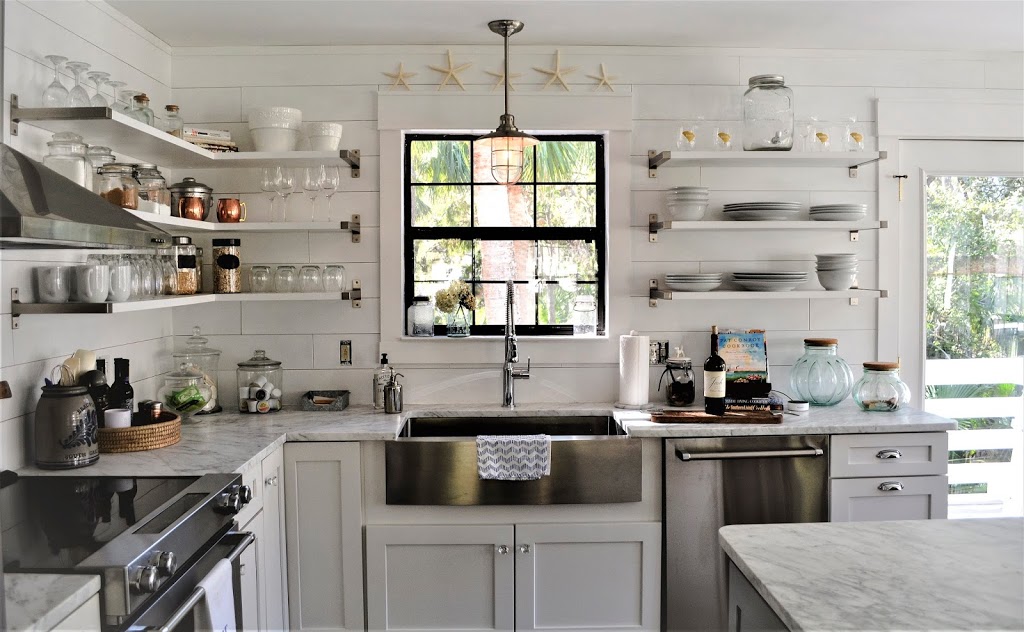
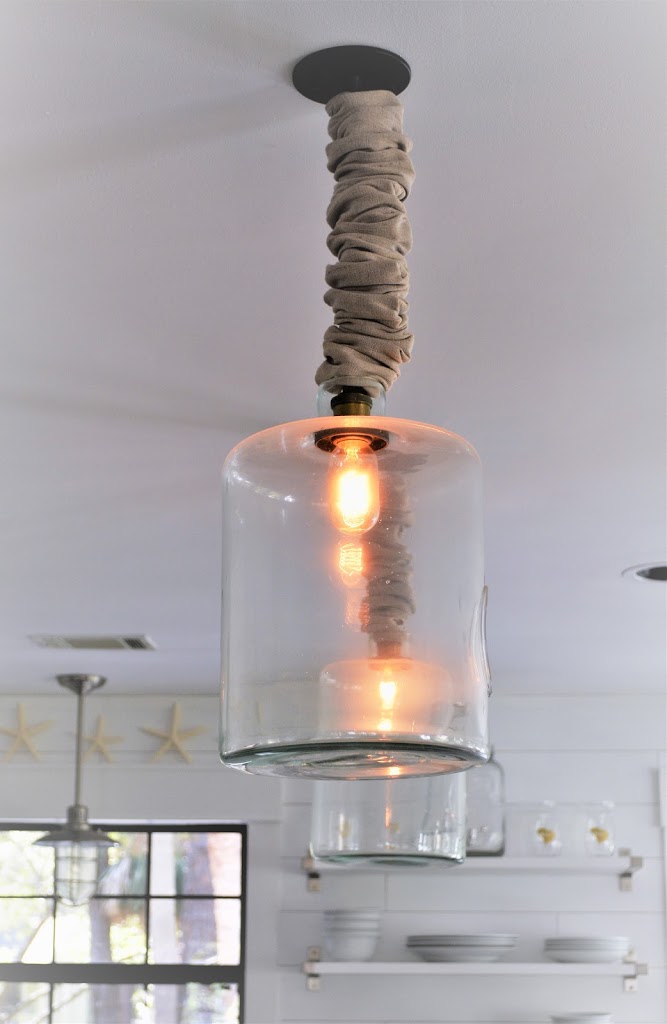
An old door is re-purposed as the tabletop and large glass jars are transformed into pendant lights.  A collection of old and new, earthy and coastal unite to form a palette that is just enough country blended with just enough coastal.


Kimberly Kerl, owner of Kustom Home Design residential design firm, lives and works in the Upstate of SC.  Her award winning work over the past 20 years has produced a long list of satisfied clients.  If you are interested in designs for a new home or home renovation, contact Kimberly by visiting the “Contact Info” tab at the top of the page.
BlogCatalog

Filed Under: appliances, Articles & Events, Blog, coastal design, custom home design, custom kitchen, dark wood floors, design inspiration, kitchen renovation, NKBA, open concept, open shelving, remodeling, renovation, residential design, sea glass

Get Started

Questions? Want to see if we're the right fit?
 
CONTACT US
 

Residential Design: Where to Start and How to Proceed

September 20, 2012 by Kimberly Kerl

You’ve decided you’re ready to pursue that renovation or new building project that you’ve been thinking about for so long now, but you don’t know where to begin or what to expect. Delving into the unknown can make us apprehensive and anxious, so here is some helpful information to prepare you for what to expect and to provide you with some direction along the way.

Like most things in life, a renovation and new home project requires some planning. The first step in the process should be to locate and interview residential designers or architects. These are the professionals who will help you bring your vision to life. Starting with a design professional will enable you to organize and develop your thoughts, needs, desires, and budget. You will walk away from the design process with the documents you need to successfully solicit comparable bids from contractors which will give you better pricing and result in a faster construction time and fewer change orders.

What does a residential designer or residential architect really do?

There are five basic phases to the home design process:
1. Programming
2. Schematic Design
3. Design Development
4. Design Documents
5. Construction Administration

Programming: During this phase the designer will meet with you to determine your wants, needs, and desires. A quality designer will ask you seemingly unimportant questions about your lifestyle, your priorities, your current and future needs and will want to learn about your personal character and style. Be prepared to explain what you like and dislike about your current home, be specific. Designers and architects are trained problem solvers, but they can’t read your mind, so tell them what problems you are having in your current home or have had in other homes. Prepare a prioritized list of desired changes, in the case of a renovation, and a prioritized list of desired rooms or spaces, in the case of a new home. Try to determine what the reasons are for wanting to renovate or build in the first place. Perhaps you need more space, better flow between rooms, more natural light, improved function or more storage. Let the designer learn about you and what you need so they can successfully transform those needs and desires in a unique design solution. If you are beginning a renovation project, the designer will visit the site and take measurements of the existing home as they relate to the area to be renovated. If you are building a new home the designer will want to visit the site and document existing site conditions during this phase.

Schematic Design: During this phase the designer will use all of the information gathered in the programming phase to develop multiple design solutions. They will meet with you to review their designs and will want to get your feedback. Be honest with your designer. If you do not like the solutions they have presented, tell them so and more importantly, tell them why. Most likely you will like bits and pieces from each of the designs. The designer will revise the plans and elevations based on your comments and will meet with you again to review the new designs. This process will continue until you have a design solution that meets all of your needs and desires.

Design Development: During this phase, the designer will continue to develop the project based on the approved schematic design from the previous phase. They will begin to work out details, and refine what materials will be used and get more in depth with you about the appliances, plumbing fixtures, light fixtures, mechanical systems and more. If your designer does not suggest it, you may want to request that the designer prepare a preliminary set of floor plans, exterior elevations, and an outline specification to use for preliminary pricing purposes. A reputable contractor will give you a preliminary estimate based on these early documents to confirm that the design is on target with your budget. The preliminary pricing at this stage may help you avoid costly design changes during the design document phase. The further along you advance in the design process and decide to make changes to the project, the more it will cost you in design fees. However, with that being said, it will always cost you more to make changes during construction than it will to make changes during any part of the design process. Once the design is further developed and you are happy with the results, the designer will begin the design documents phase.

Design Documents: This is phase where the designer will produce the documents necessary for the contractor to build the project. The amount of information contained in your design documents will depend on the level of documentation you request from your designer.  Smaller scale or less complex designs may only require a basic set of design documents that include a floor plan with notes and dimensions, an exterior elevation showing the outside appearance of the home with notes and dimensions, and a site plan locating the home on the site. While a more complex or larger scale project would require an expanded set of design documents which can include the same floor plans, elevations, and site plan mentioned above along with wall sections which define the materials and limited methods of construction for the floors, walls, and roof; and building sections illustrating the connection between new and existing structures and any significant areas of the project where the contractor needs to be given additional information.  Expanded sets can also include a finish schedule listing all of the finish materials, moldings, cabinetry, and counter tops for each room; interior elevations illustrating the designs of all the cabinetry, handrails, stairways, and moldings throughout the home along with notes and dimensions; and specifications which are written instructions concerning all of the materials to be used inside and outside the home. The more information you provide your contractor with, the less likely you are to have problems during construction.  Some contractors will tell that they don’t need any drawings or that they only need a floor plan. You are putting yourself and your home at risk if you proceed without documentation or with minimal documents. If you plan on soliciting bids from multiple contractors, an expanded set of construction documents will ensure that each contractor is bidding on the same thing and you will receive competitive prices that are far less likely to change during construction.  An expanded set of documents will cost you more in design fees initially, but it will save you time and money in the long run.

Construction Administration: This phase is optional in the residential industry, but it is recommended if you have limited time to contribute to the oversight of the construction. During construction administration, the designer will visit the job site at intervals relative to the phase of construction to make sure the project is being built as intended. The designer will not conduct inspections, code officials will need to be called in to inspect the project for code compliance at the various stages. If there is a problem or you would like to make a change, the designer should be asked to be involved in the resolution or redesign. Construction is the longest phase of the process and having a designer who can act as your personal advocate from start to finish will make your home and you life much better.

Obviously, this is a lot of information and I have only explained the basics of each phase, but hopefully I have provided you with a guide that gives you a better understanding of and appreciation for the design process. As always, questions and comments are encouraged.  If you want more information, leave a comment on the blog or refer to my contact tab at the top of the page. 

BlogCatalog

Filed Under: addition, architect, architecture, Articles & Events, Blog, building, construction, design, home, house plans, planning, remodeling, renovation, residential design

Get Started

Questions? Want to see if we're the right fit?
 
CONTACT US
 

Taking Advantage of a Buyer’s Market Without Getting Taken Advantage of …

April 29, 2010 by Kimberly Kerl

The news is bleak, the statistics grim; yet all the reports seem to offer a ray of hope summarized in the oft repeated phrase, “Buyers Market”. We are inundated with rebates, incentives, price reductions, reward points, and tax credits. Building material costs have dropped in some areas and contractors are hungry for work. Whereas, two years ago you couldn’t find a contractor willing to return your call about renovating your powder room, now there are four contractors on your door step competing for the opportunity just to talk to you. What could better, right?  Wrong.

While it is true that building and construction prices are more competitive, it is also true that many builders and contractors need to make more money off each project because there are fewer of them. Herein lies the problem. The residential building and design market has become flooded with contractors and designers that have been laid off from their commercial jobs and are picking up residential projects to help them get by. On top of this influx of commercial professionals, there has been on overall decrease in the number of actual projects. Anytime you have more sellers and less buyers, the advantage goes to the buyer; however, buyers beware.

The adage, “You get what you pay for” and “You can’t get something for nothing” still applies. So how do you take advantage of the buyer’s market without getting taken advantage of ?

• Reputation and References: Only hire reputable professionals that provide you with current references that you actually call and talk to. Don’t hire your neighbor’s friend from church who works out of his 1985 pick-up truck.

• Residential Experience: Do not hire a commercial professional to do a residential project. The two building types are completely different animals. Would you take your child to a vet or your dog to the pediatrician? I hope not.

• Plan Ahead: Decide what changes you want to make to your house and why. Prioritize between “must haves” and “in an ideal world” issues. Research the higher cost items such as appliances, light fixtures, plumbing fixtures, etc. Price compare online, but buy local. If you have a problem down the road, you want someone close by who can fix it.
• Determine Your Budget: Unless you have more money than sense, it will serve you well to determine how much you can spend and how much you would like to spend on your project. Even if you have no idea how much it will cost, knowing how much you can spend will help your designer guide you on decisions. Lenders are being stingy with their loans and appraisals are coming in low. Get pre-qualified for financing before you begin designing.

• Get Drawings Before You Build: If your contractor tells you he doesn’t need drawings to build from, don’t believe him. That’s like going into surgery without the x-rays or ultrasound. You’ll have no idea what you’re getting into. Contractors know that with quality floor plans, details, and elevations they are required to give you what you expect at the price they quoted you. Without drawings, they can constantly raise the price because they can claim that they didn’t know you wanted doors and windows included in the cost of your new bedroom.

• Don’t Automatically Go With the Low Bid: The lowest bid is rarely the best choice. Get at least three bids and if one bid is significantly lower than the others, then they probably left something out or they don’t know how to estimate. Ask your designer to review the bids and compare them with you.

• Desire Quality not Quantity: Bigger isn’t always better, so don’t sacrifice quality building products or methods for more space. Your renovation done right will add value to your home and life, but poorly built additions and renovations will actually decrease your home’s value and result in headaches and repairs galore. If you don’t know the difference between high quality and poor quality building products and methods, you need to hire a designer that does.

This is great time to take advantage of some lower construction costs, but there are also more people willing to take advantage of you in the process. Don’t be afraid to pursue those renovations and additions you’ve been dreaming about. Just be smart about who you choose to help make them a reality.

BlogCatalog

Filed Under: architecture, Articles & Events, Blog, construction, design, home, house plans, remodeling, renovation

Get Started

Questions? Want to see if we're the right fit?
 
CONTACT US
 

Before & After…a 1980’s Kitchen gets a makeover

April 20, 2010 by Kimberly Kerl

This is what we started with…

The existing kitchen was a typical 1980’s eat-in style. The breakfast table was at one end with the cabinetry and appliances at the opposite end. The refrigerator and pantry closet were located on the wall between the kitchen and den. There was a standard size door opening between the den and kitchen. The appliances included the original wall oven with microwave above, cooktop, hood, dishwasher, and a standard sized side-by-side refrigerator. The countertops were plastic laminate with a standard 4” integrated backsplash. The cabinets were site-built and had been painted white over the original dark stain. The flooring was the original sheet vinyl and the walls and ceiling were painted sheetrock.
Lighting was also original to the house and was very dated with the large wood framed fluorescent and white and brass chandelier.


This was the problem…

The main task was to design a solution that would provide the most improvement for the least amount of money.  The kitchen was currently
closed off from the rest of the house although it served as a main artery by feeding access to the laundry room and garage, back yard deck, den and dining room. Improved flow with the rest of the house and transforming the space into a central gathering area for family friends became a priority. The current design had very little counter space. The sink, cooktop, and wall oven ate up much of the counter leaving less than 5 ½ feet of workspace, so more workspace was a must. Other desires included improved lighting, new appliances, more efficient storage, and updated finishes.


This is the solution…

 
The renovation transformed not only the kitchen, but almost the entire main living level without much disruption to the home. By opening up the wall between the kitchen and den and replacing the breakfast table with an eat-in island the whole living space was transformed. The kitchen and den now function beautifully together and provide a fantastic space to gather and complete homework or to gather with friends and socialize.

The additional cabinetry and workspace makes the kitchen a joy to work in. Pantry storage is contained in an extremely efficient and easy to use butler’s cabinet, while utility items are neatly stored in the utility cabinet next to the new counter depth refrigerator. The spaces are as beautiful as they are useful. This entire renovation was custom designed with thoughtful consideration and integration of all elements including the structure and framing, electrical and lighting, plumbing fixture selection, appliance selection and placement, cabinetry detailing, new hardwood flooring, new paint, custom tile backsplash and carefully selected granite countertops. All of these changes were made for less than 10% of the value of the home. The renovation was completed within two months and it has significantly improved not only the homes value, but more importantly the family’s quality of life.

If you are considering remodeling, renovating, or adding onto your house; or if you want to know what is possible…contact me and I will give you design solutions you never thought were possible and will leave you wondering how you ever lived without them. For more information on this project or for vendor references please visit my Profile for contact information or simply leave a comment.
Cabinet Maker:  David Drummond, D Square Custom Cabinets  (864)640-3227 cell
Cabinet Finisher:  Joey Dill, Southern Coatings (864)304-7997
Hardwood Flooring Installation:  Ben Quebe, Quebe Flooring (864)303-6347
Appliance Sales & Installation:  Alan White, White’s Appliances (864) 859-8208
Countertop Fabricator & Installer:  David Springer, Campbell Tile (864) 288-3371
Granite Supplier:  Robbie Rousey, Classic Granite & Marble, Inc. (864) 292-0784
Plumbing Fixture Supplier:  Carmen Runion, Ferguson Enterprises (864) 288-0281
Light Fixtures:  The Lighting Center (864) 268-4822
BlogCatalog

Filed Under: appliances, architecture, Articles & Events, Blog, cabinetry, design, granite countertop, hardwood floors, home, house plans, kitchen design, remodeling, renovation

Get Started

Questions? Want to see if we're the right fit?
 
CONTACT US
 

Located in Greenville, SC
Phone: 864.561.4103
E-mail address: inquiry@kustomhomedesign.com

Copyright © 2023 · Foodie Pro Theme on Genesis Framework · WordPress · Log in